Small Batch Gluten Free Sourdough Starter

Gluten-free sourdough starter transforms gluten-free flours into tangy, bubbly culture, perfect for baking delicious, airy sourdough bread that’s full of flavor

Prep time:

Cook time:

Total time:

gluten free sourdough starter how to

Small Batch Gluten Free Sourdough Starter

Creating a gluten-free sourdough starter is a rewarding and heartwarming process that brings the classic tangy flavor of sourdough bread to those avoiding gluten. Unlike traditional sourdough starters, which rely on wheat flour, a gluten-free starter uses a blend of gluten-free flours to cultivate the wild yeast and beneficial bacteria needed for fermentation. This gluten-free starter not only allows you to enjoy the beloved sourdough taste but also opens the door to baking a variety of gluten-free sourdough breads, ensuring that no one misses out on this artisan delight.

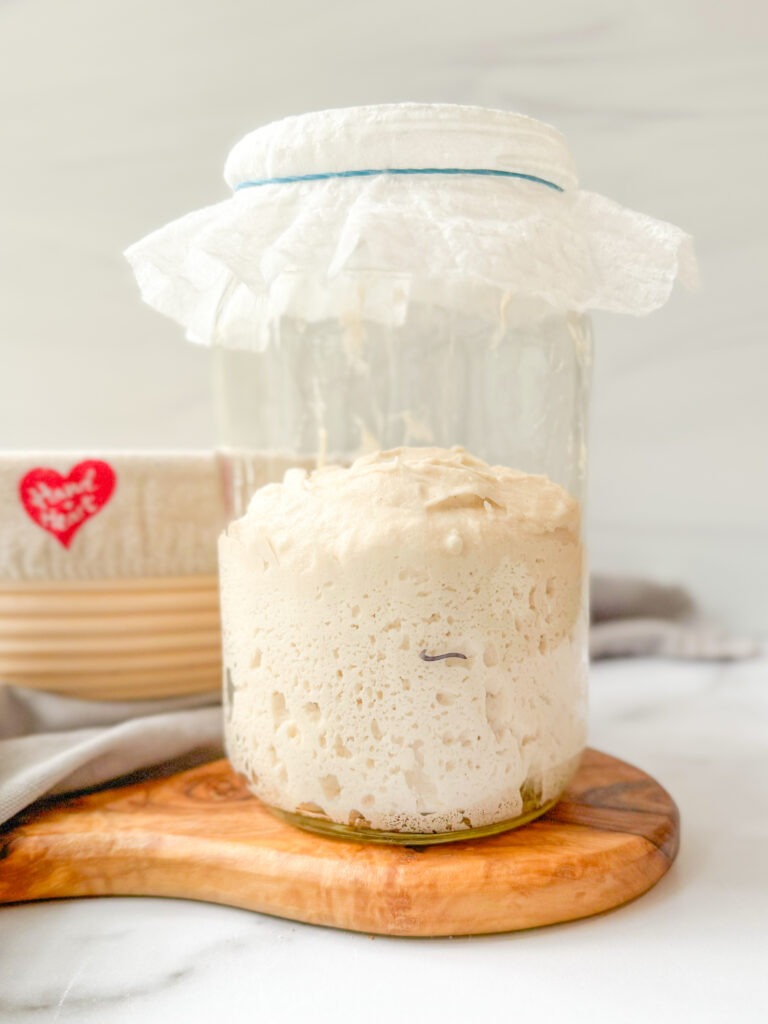
The journey of making a gluten-free sourdough starter begins with a simple mix of gluten-free flours, such as rice flour or sorghum flour, combined with water. Over the course of several days, this mixture will attract wild yeast from the environment, gradually developing a bubbly, tangy culture. It’s a process that requires patience and a bit of attention, as you’ll need to feed the starter regularly to keep it active and thriving. As it ferments, it develops the characteristic sour flavor that makes sourdough so special.

One of the joys of maintaining a gluten-free sourdough starter is the flexibility it provides in baking. Once your starter is active and bubbly, you can use it to make a variety of gluten-free sourdough breads, from crusty loaves to soft rolls. The natural fermentation process not only enhances the flavor but also improves the texture of the bread, making it airy and light despite the absence of gluten. It’s a satisfying way to enjoy the art of sourdough baking without compromising dietary needs.

Baking with a gluten-free sourdough starter brings a touch of homemade comfort to your kitchen. The process of nurturing your starter and watching it develop is both gratifying and enjoyable. With each feeding and baking session, you’ll become more familiar with the nuances of gluten-free sourdough, allowing you to create delicious, homemade bread that everyone can enjoy. Whether you’re a seasoned baker or just starting out, a gluten-free sourdough starter opens up a world of baking possibilities, making it easier to enjoy the hearty, tangy flavors of sourdough without gluten.

This recipe is made with Hand & Heart Gluten Free Flour Blends.  Click HERE to visit our shop and discover our collections of gluten free flour and baking tools?

gluten free sourdough starter how to

Small Batch Gluten Free Sourdough Starter

Gluten-free sourdough starter transforms gluten-free flours into tangy, bubbly culture, perfect for baking delicious, airy sourdough bread that’s full of flavor
Pin it
Print it

Prep time:

Cook time:

Total time:

Yield:

Author:

Hand + Heart Gluten Free

made by hand, from the heart

Ingredients

Equipment:

1 digital scale (not necessary but beneficial)

1 glass jar

1 stirring tool (a spoon, small rubber spatula, chopsticks)

1 rubber band (to keep track of how much your starter has risen)


Ingredients:

Sorghum flour (fine/organic for better success) or Hand & Heart Gluten Free All Purpose Flour

Water (spring water or filtered water, no tap water/distilled water)

1 teaspoon honey/sugar/maple syrup

Instructions

INSTRUCTIONS:


Day 1

  • Place the jar you are using on the scale and write the weight on the jar.  This will make it easier for you to keep track of how much starter you have.


    1. Stir the mixture with any kitchen utensil (stainless steel/wood are fine)
    2. Scrape the sides of the jar, and cover the jar with a cheesecloth or coffee filter and secure with a rubber band. The cover is necessary to prevent anything from getting into the starter.  
    3. It is important to scrape the sides of your jar to prevent it from building up on the walls and growing mold.  I usually use a damp paper towel using filtered water and wipe the inside of the jar.
    4. Store your starter away from direct sunlight and separate from other food. 
  • Placing it near other foods especially fruits can increase the risk of mold. Choose a warm spot in your house, but avoid placing it on a radiator or too close to a fireplace, as excessive heat can harm the bacteria.  
  • If you’re starting your starter during cold winter months, you warm up the space with a space heater or a lamp to warm up the space.


Day 2

What to expect:  

  • At this point, you might start seeing some little bubbles. Proceed to the next step.  If no bubbles or any activity, wait another 24 hours.   
  • The starter might still smell like wet flour or dough
  • Some clear liquid might form at the top.


Day 3

  • Once you start seeing bubbles, it is time to start the feeding and discarding process! Discarding a portion of the starter is necessary to maintain a manageable amount and reduce waste. 


  • Remove 20g of the starter from the jar and add 20g sorghum and 20g water. 
    1. Stir, scrape the sides, clean sides of jar with damp paper towel, cover with cheesecloth or coffee filter secured with a rubber band and let sit for 24 hours.
    2. Every time you feed the starter, you need to feed it at least at a 1:1:1 ratio            (starter : flour : water), meaning if you have 20g of starter, you will need to feed it with 20g of sorghum flour and 20g of water. If you don’t discard, you will end up having to increase the amount of water and flour with each feeding.


Days 4


What to expect:  

  • More bubbles are forming.
  • Some clear liquid might form at the top.
  • Starting to smell yeasty, sour and sweet if you added sugar.
  • At this point, we will start feeding and discarding our starter 2x a day to build up its strength. 
    1. Stir starter.
    2. Weigh the jar and discard half of starter.
    3. Add 20g of flour and 20g of water.


Don’t use or save the discard for the first 7 days as it has harmful bacteria that can make you sick! After 7 days, you can collect discard in a separate jar and use it in gluten-free recipes that call for sourdough discard later.


Days 5 – 14


What to expect:  

  • Bubbles are looking good and appearing throughout the starter at least by day 10.
  • Starter may start to look dry.  This is normal as the bacteria starts to get stronger.
  • The aroma is pleasant, more yeasty, sour and sweet if you added sugar.
  • If your starter is not bubbly yet, this could be because of the temperature in your home or other variables.  Continue to feed your starter until you are happy with the texture, smell and bubble activity.


  • Feed your starter every 12 hours for best results. However, if you forget to feed it at the 12-hour mark, feed it whenever you can and continue the process! It is best to keep feeding and discarding 2x a day for the first 2 weeks.


  • After that, you can keep your starter in the refrigerator when you aren’t baking with it. If you keep it in the fridge, make sure to feed and discard it at least 1x – 2x per week to keep the starter healthy and active.


  • After about 10-14 days of consistent daily feedings and discarding, you can try baking your first gluten-free sourdough loaf! To bake your first loaf, you will need at least 150g of starter.  Weight your jar to determine amount of starter and add the same amount of flour and water. So if you have 60g of starter, you will need to add 60 grams of flour and 60 grams of water.  You will need some extra left to maintain the starter. Once it reached its peak activity (when it is at its highest point), you can use it in a bread recipe!


Note: if you are keeping your starter in the fridge, instead of using a cold starter in bread, it is best to take it out of the refrigerator and feed/discard it at least twice at 12-hour intervals before baking bread.


IMPORTANT: Wait for at least 10 days before making bread with your starter.


How to store:

  • If your starter is ready, but you can’t find time to bake with it for a while, transfer to the refrigerator until you’re ready.  Make sure you continue to feed with 1-2x a week. Once you are ready to bake with it, you will need to feed it and bring it back to room temperature in a warm place.  This step will bring the yeast back to life.


Is it ready:

  • Wait for at least 10 days before making bread with your starter.  Your starter is ready to use once it grows a little (sometimes a little) in size a few hours after feeding.
  • The sourdough wild yeast has a lot of bubbles throughout.
  • When it smells pleasant, mildly sour, sweet and not too yeasty.
  • When the texture is bubbly and light.


How to use:

  • It’s ready to use in a recipe once the starter is bubbly and light 


How to maintain:

  • Storing your starter in the refrigerator is most likely your best bet if you don’t plan to bake a lot. 
  • You will need to feed your starter 1-2x a week to keep it alive.  Liquid will form at the top.  Just stir, discard and feed 1:1:1 ratio (starter : flour : water).  Store in the refrigerator with a the jar lid and keep it tight.


Troubleshooting FAQs

  • If mold appears, please throw it out and start over.


  • Your starter should be completely discarded if undesirable aromas occur.  You will know if it’s gone bad, the smell will be awful.


  • If you need a larger quantity of bubbly starter to make more bread or you want to bake twice a day, simply increase your feedings.  You could also divide your starter into 2 jars so your jars won’t overflow with increased feeding.


  • You can dry your starter to store for later use and to avoid starting over. To dry it, just spread a thin layer of starter onto parchment paper and leave it out on the kitchen table for a day or two to dry out. Once dried, keep in an airtight container or a bag until ready to use again! When you’re ready to use, just add enough water until it’s the consistency of loose pancake batter.  Resume the process of feeding and discarding.


keywords:  gluten free Sourdough Starter, Sourdough Starter

Show Some love
Did you make this recipe?
Tag @handandheartglutenfree on instagram
Be the first to write a review

Leave a Reply

Your email address will not be published. Required fields are marked *