Gluten Free Sourdough Starter Dehydrated Quickstart

Prep time:

5 min

Cook time:

Total time:

7 days

gluten free sourdough starter using dehydrated starter

Gluten Free Sourdough Starter Dehydrated Quickstart

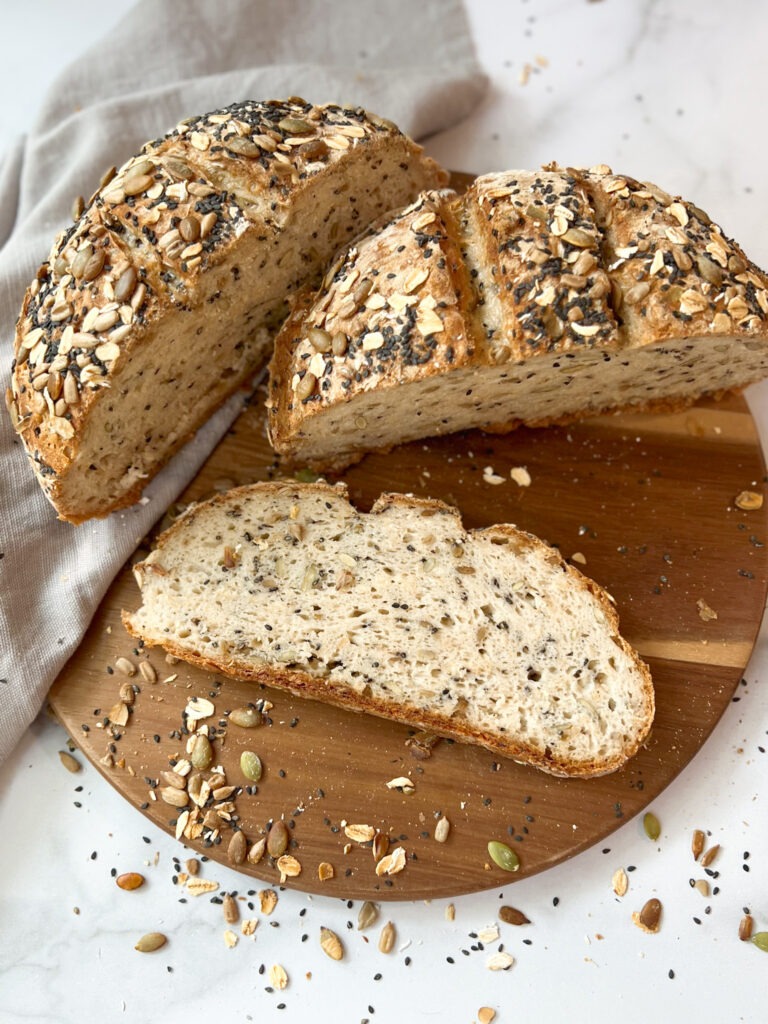
Welcome to the wonderful world of gluten-free sourdough baking! If you’ve got a dehydrated gluten-free starter made with sorghum flour, you’re in for a treat. With just a little water, some sorghum flour, and Hand + Heart Gluten Free All Purpose Flour, you’ll have your starter bubbling and ready to bake delicious bread in no time. Best of all,  discarding is optional during the revival process!

In just seven days of feeding, you’ll have a lively starter perfect for making soft sourdough sandwich bread or crusty sourdough loaves. Let’s get started on reviving your dehydrated gluten-free starter and soon you’ll be enjoying the delightful taste of homemade sourdough bread!

This recipe is made with Hand & Heart Gluten Free Flour Blends.  Click HERE to visit our shop and discover our collections of gluten free flour and baking tools?

gluten free sourdough starter using dehydrated starter

Gluten Free Sourdough Starter Dehydrated Quickstart

Pin it
Print it

Prep time:

5 min

Cook time:

Total time:

7 days

Yield:

Author:

Hand + Heart Gluten Free

made by hand, from the heart

Ingredients

Dehydrated Sorghum Sourdough Starter:  40 grams / 2 tries of 20g

Equipment:

1 digital scale (not necessary but beneficial)

1 glass jar

1 stirring tool (a spoon, small rubber spatula, chopsticks)

1 rubber band (to keep track of how much your starter has risen)


Additional Ingredients:

Hand + Heart Gluten Free All Purpose Flour (1 to 1) or Sorghum flour (fine/organic for better success)

Water (spring water OR filtered water, NO tap water/distilled water)

Instructions

Day 1

  1. Place the jar you are using on the scale and write the weight on the jar. This will make it easier for you to keep track of how much starter you have as you feed it.
  2. Mix in jar:


For feeding with Hand + Heart Gluten Free All Purpose Flour (1  to 1)

  • 20 grams of dehydrated starter
  • 20 grams H+H 1 to 1 Flour
  • 60 grams water or more (H+H needs additional water than other single starch)


For feeding with Sorghum Flour

  • 20 grams of dehydrated starter
  • 20 grams H+H 1 to 1 Flour
  • 40 grams water or more until the consistency of loose pancake


  1. Stir the mixture with any kitchen utensil (stainless steel/rubber spatula/wood are fine). Add additional water 1 teaspoon at a time if needed.  Your starter should be the consistency of a thick paste if using H+H APF 1 to 1 and loose pancake consistency with Sorghum flour.
  2. Scrape the sides of the jar, and cover the jar with a cheesecloth or coffee filter and secure with a rubber band. The cover is necessary to prevent anything from getting into the starter.
  3. It is important to scrape the sides of your jar to prevent it from building up on the walls and growing mold. Use a damp paper towel using filtered water and wipe the inside of the jar.  Clean inside walls of the jar with each feeding.


Store your starter away from direct sunlight and separate from other food.

    1. Placing it near other foods especially fruits can increase the risk of mold. Choose a warm spot in your house, but avoid placing it on a radiator or too close to a fireplace, as excessive heat can harm the bacteria.
    2. If you’re starting your starter during cold winter months, you warm up the space with a space heater or a lamp to warm up the space. Jar may be placed in an oven with light on, keep the door ajar so it doesn’t get too warm and kill the starter. A sourdough starter pad may also be used.
    3. Optimal temperature for starter environment is around 70ºF. A little higher or lower will not hurt your starter.  Temperature above 125ºF will kill your starter.


Day 2

What to expect: 

  • At this point, you might start seeing some little bubbles. Procced with next feeding even if no bubbles or any activity.
  • The starter might still smell like wet flour or dough.
  • Some clear liquid might form at the top.
  • Do not discard and proceed with 2nd day feeding: 1:1:1 feeding for the next 4 days will not be followed.  We’re strengthening our starter and feeding with less quantity so the good bacteria can feed quicker and wake up the starter faster. 


For feeding with Hand + Heart Gluten Free All Purpose Flour (1  to 1)

  • 40 grams H+H 1 to 1 Flour
  • 40 grams water or more


For feeding with Sorghum Flour

  • 40 grams Sorghum Flour
  • 40 grams water or more


  • Repeat with stirring and storing instructions on Day 1.


Day 3 – 5

What to expect: 

  • At this point, you might start seeing more bubbles.
  • The starter might still smell like wet flour or dough.
  • Some clear liquid might form at the top.
  • Do not discard and proceed with daily feeding for the next 3 days:


For feeding with Hand + Heart Gluten Free All Purpose Flour (1  to 1)

  • 40 grams H+H 1 to 1 Flour
  • 80 grams water or more


For feeding with Sorghum Flour

  • 40 grams Sorghum Flour
  • 40 grams water or more


  • Repeat with stirring and storing instructions on Day 1.


Days 6

 What to expect: 

  • Bubbles are looking good and appearing throughout the starter at least by day 5.
  • Starter may start to look dry. This is normal as the bacteria starts to get stronger.
  • The aroma is pleasant, more yeasty, sour and sweet.


  1. At this point, you are ready to bake your first gluten free sourdough loaf!
  2. To bake your first loaf, you will need at least 150g of starter. Weight your jar and deduct the weight of the jar to determine amount of starter.
  3. You should have about 540g if using H+H APF and roughly 400g with Sorghum. Once it reached its peak activity (when it is at its highest point may or may not double), you can use it in a bread recipe!
  4. You will start feeding and discarding to control amount of starter after removing starter for your first bake, so if you have 300g of starter left, you will need to discard half which is150g starter and add 150 grams of flour and 150 grams or more of water in the jar. You can also use your discard to bake another bread instead of saving in a separate jar.
    1. Stir starter.
    2. Weigh the jar and discard half of starter.
    3. Add equal amount of flour and water to discard (1:1:1).


Store discard in a separate jar and use it in gluten-free recipes that call for sourdough discard later.


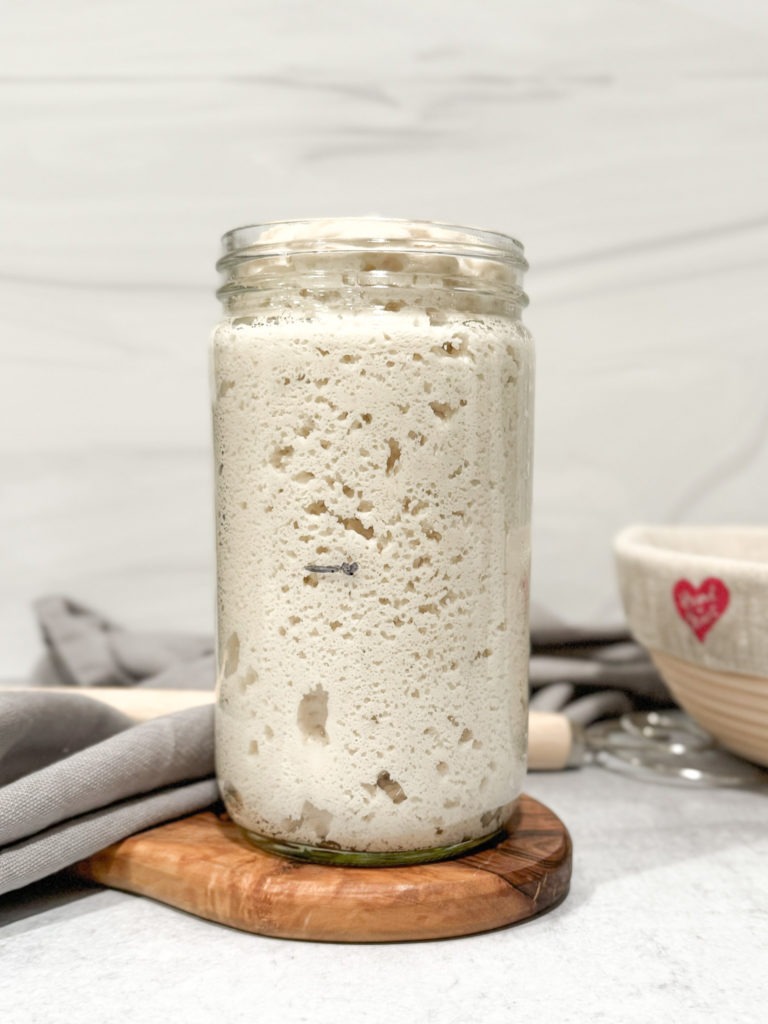
NOTE:  If your starter is not bubbly yet, this could be because of the temperature in your home or other variables.  Continue to feed your starter until you are happy with the texture, smell and bubble activity.


Feed your starter every 12 hours for best results. However, if you forget to feed it at the 12-hour mark, feed it whenever you can and continue the process!


After that, you can keep your starter in the refrigerator when you aren’t baking with it. If you keep it in the fridge, make sure to feed and discard it at least 1x – 2x per week to keep the starter healthy and active.


If you are keeping your starter in the fridge, instead of using a cold starter in bread, it is best to take it out of the refrigerator and feed/discard it at least twice at 12-hour intervals before baking bread.


IMPORTANT: Wait for at least the 6th day before making bread with your starter for best results..


How to store:

  • If your starter is ready, but you can’t find time to bake with it for a while, transfer to the refrigerator until you’re ready. Make sure you continue to feed with 1-2x a week. Once you are ready to bake with it, you will need to feed it and bring it back to room temperature in a warm place.  This step will bring the yeast back to life.


Is it ready:

  • Wait for at least 6 days before making bread with your starter. Your starter is ready to use once it grows a little (sometimes a little) in size a few hours after feeding.
  • The sourdough wild yeast has a lot of bubbles throughout.
  • When it smells pleasant, mildly sour, sweet and not too yeasty.
  • When the texture is bubbly and light.


How to use:

  • It’s ready to use in a recipe once the starter is bubbly and light


How to maintain:

  • Storing your starter in the refrigerator is most likely your best bet if you don’t plan to bake a lot.
  • You will need to feed your starter 1-2x a week to keep it alive. Liquid will form at the top.  Just stir, discard and feed 1:1:1 ratio (starter : flour : water).  Store in the refrigerator with a the jar lid and keep it tight.


Troubleshooting FAQs

  • If mold appears, please throw it out and start over.


  • Your starter should be completely discarded if undesirable aromas occur. You will know if it’s gone bad, the smell will be awful.


  • If you need a larger quantity of bubbly starter to make more bread or you want to bake twice a day, simply increase your feedings. You could also divide your starter into 2 jars so your jars won’t overflow with increased feeding.


  • You can dry your starter to store for later use and to avoid starting over. To dry it, just spread a thin layer of starter onto parchment paper and leave it out on the kitchen table for a day or two to dry out. Once dried, keep in an airtight container or a bag until ready to use again! When you’re ready to use, just add enough water until it’s the consistency of loose pancake batter. Resume the process of feeding and discarding.


keywords:  gluten free sourdough starter

Show Some love
Did you make this recipe?
Tag @handandheartglutenfree on instagram
Be the first to write a review

Leave a Reply

Your email address will not be published. Required fields are marked *